#light tutorial
Explore tagged Tumblr posts
Visit Tumblr Blog
Explore Tumblr blogs with no restrictions, modern design and the best experience.
Last Seen Tumblr Blogs


Fun Fact
In 2020, Tumblr had 29.4 million users in the US.
Text


Shop Sign Wall Lights - UPDATED 15 May 2025
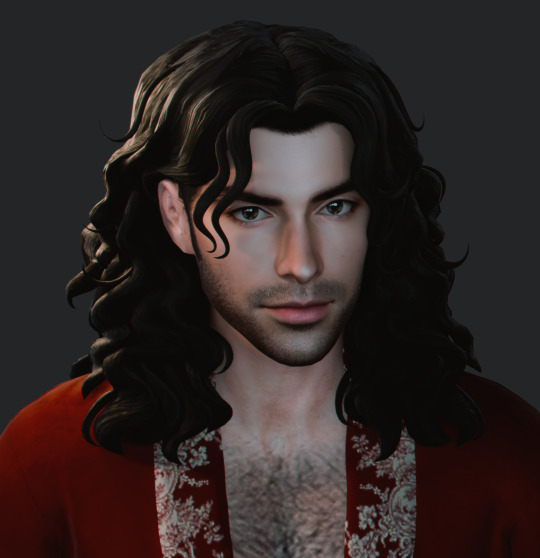
I put together a few sets of shop sign wall lights. But there are instructions. I kept some swatches as a default white color so that you could pick which color you want the light to be while in live mode. This saved on the file size of the package file because the more textures a file has, the more bloated the file size is.
I had some fun with some shop names although I mainly included generic titles in both English and Simlish.
DOWNLOAD for FREE: SFS
OR at Patreon*
*You must be over 18 to access my Patreon page.
INSTRUCTIONS ON CHANGING LIGHT COLORS
Once you place the light in build mode, then go to live mode. Click on the light and you will get the following pie menu.

Select SET COLOR AND INTENSITY and then choose THIS LIGHT. The color options will then appear so you can select which color you want.

If you use the name signs along with the Awning Lights, make sure to place the name on top of the awning so when you select the color picker, the correct sign changes colors. The other option is to place the name separate from the awning, go to live mode and change the color, then go back to build mode and add the awning light you want.
Enable the bb.moveobjects on cheat and then you can make adjustments to location and size of objects. You can adjust the position of the light on the wall by depressing the Alt key while placing the sign (on PC). You can adjust the size of the item by depressing the Shift key and either [ (for smaller) or ] (for bigger) (on PC).
CREDITS
Awning Shop Lights - 19 swatches of various awning wall lights. 18 are pre-colored and one is white so you can change the color yourself in game.
Candy Shop Lights - 20 swatches
Pottery Shop Lights - 25 swatches
Tattoo Shop Lights - 21 swatches
Enjoy!
Creations by SexyIrish7
These cc objects are new 3d meshes created using Blender and Sims 4 Studio.
Polygon Count: 6
All CC have:
*Ability to search catalog using search terms: sexyirish7 and si7
*Customized thumbnail
*******
CREDITS:
Software credits:
Sims 4 Studio v. 3.2.4.1 (Star): https://sims4studio.com
Blender 4.0: https://www.blender.org/download/
GIMP v. 2.10.34: https://www.gimp.org/
Inkscape v. 1.2: https://inkscape.org/
Thank you to the creators and moderators producing tutorials and answering questions!
*******
Model and Image credits:
Mesh created by me.
Simlish font credit to Franzilla: https://modthesims.info/
Image credits:
Awning Lights Image credits: Modified image from Adobe Stock
Candy Shop Image credits:
Swatches 1-3: Image by pch.vector on Freepik https://www.freepik.com/free-vector/christmas-candies-symbols-set-neon-style_11241813.htm#fromView=search&page=1&position=26&uuid=8b541325-0e62-4e37-9468-6bacd30f8963&query=neon+lollipop+candy
Swatches 4-8: Image by gstudioimagen on Freepik https://www.freepik.com/free-vector/sweet-candy-neon-seamless-pattern_5595774.htm#fromView=search&page=2&position=30&uuid=e2259de5-014d-4d04-af87-1198ee0f35e2&query=%40gstudioimagen+neon
https://www.freepik.com/free-vector/sweet-candy-neon-seamless-pattern_5595775.htm#fromView=search&page=1&position=27&uuid=e2259de5-014d-4d04-af87-1198ee0f35e2&query=%40gstudioimagen+neon
Swatches 9-10: Image by openclipart.org https://all-free-download.com/free-vector/download/peppermint_candy_clip_art_13182.html
https://all-free-download.com/free-vector/download/round_candy_with_stick_card_on_pink_background_6823183.html
Swatch 11: Image by All-free-download.com https://all-free-download.com/free-vector/download/round_candy_with_stick_card_on_pink_background_6823183.html
Swatches 12: Image by katemangostar on Freepik https://www.freepik.com/free-vector/ice-cream-cart-neon-sign_3238564.htm#fromView=search&page=8&position=42&uuid=2f82b4d1-5ca8-449c-ae22-4573861ebcb0&query=neon+sign+retail
Pottery Shop Image credits:
Swatch 1: Crafting icons created by andinur - Flaticon https://www.flaticon.com/free-icon/pottery_17392031
Swatch 2: Image by katemangostar via Freepik https://www.freepik.com/free-vector/aquarius-neon-sign_5561944.htm#fromView=search&page=2&position=5&uuid=c55e5e21-0550-46f0-b9be-cfa85ff38796&query=Ceramic+Neon
Swatch 3-4: Pottery icons created by Smashicons - Flaticon https://www.flaticon.com/free-icon/vase_3760867
https://www.flaticon.com/free-icon/vase_3760970
Swatch 5: Icon by istar_design_bureau via Freepik https://www.freepik.com/icon/pottery_1958438#fromView=search&page=2&position=20&uuid=096084ae-13fe-429c-a419-e6e13ccd37b9
Swatch 6:Icons by Eucalyp - Flaticon https://www.flaticon.com/free-icon/pottery_6552610
Swatch 7: Icon by berkahicon via Freepik https://www.freepik.com/icon/spin_13785816#fromView=search&page=2&position=0&uuid=096084ae-13fe-429c-a419-e6e13ccd37b9
Swatches 8-11: Icons by Freepik https://www.freepik.com/icon/pottery_8540816#fromView=search&page=3&position=43&uuid=096084ae-13fe-429c-a419-e6e13ccd37b9
https://www.flaticon.com/free-icon/machine_9200546
https://www.flaticon.com/free-icon/vase_8838322
https://www.flaticon.com/free-icon/pottery_3305262
Tattoo Shop Image credits:
Swatch 1: Modified Image by katemangostar on Freepik https://www.freepik.com/free-vector/tattoo-salon-neon-text-with-tattoo-machine-neon-sign-night-bright-advertisement_2438198.htm?log-in=email
Swatch 2: Image by Nippy Custom https://www.nippycustom.com/products/tattoo-neon-sign
Swatches 3-5: Image by bohlam via Vecteezy https://www.vecteezy.com/vector-art/2185717-tattoo-studio-neon-signs-style-text-vector
https://www.vecteezy.com/vector-art/34210463-neon-sign-tattoo-studio-with-brick-wall-background-vector
*******
TOU:
Do not re-upload and claim as your own
Do not re-upload and hide behind a paywall
*******
Changelog:
15.05.2025
*Updated swatches for compatibility with slotted signs.
*Added wall deco slot so that signs can be stacked on slotted signs for Awning Signs
*Added swatches with inverted images for Candy, Pottery, and Tattoo Shop Signs.
#the sims 4 cc#ts4cc#sims 4 cc#the sims 4#wall decor#sims 4#ts4#lights#wall lights#signs#shop signs#retail#pottery#ceramics#tattoo#ink#candy#lollipop#sweets#sugar#light tutorial#sexyirish7#updated cc#featured
304 notes
·
View notes
Note
Do you have any recommended tutorials on lighting? You have such a way of making your skies glow with sunlight and i admire it a lot.
honestly doing studies helped me a lot more than anything else!! i rly recommend that everyone does studies and continues to do studies bc it helps u improve !
youtube
475 notes
·
View notes
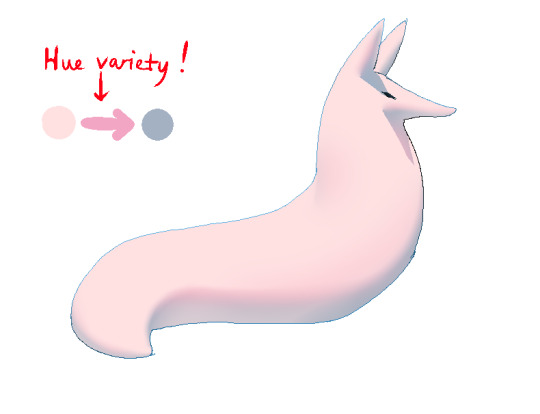
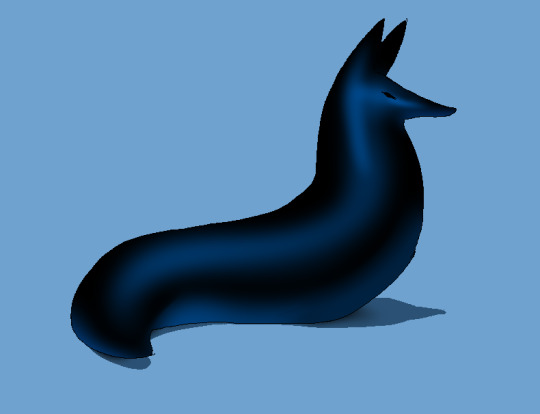
Text

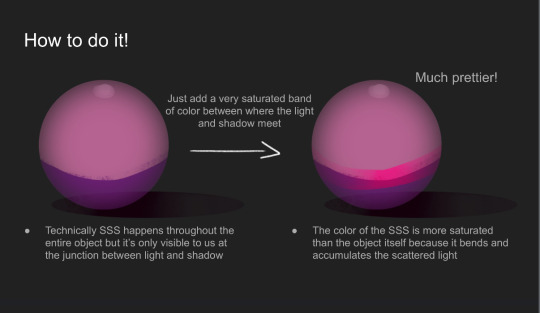
A little lighting tutorial for you my lovelies
the color of the highlight comes from the color of the light source,
the color of the ambient occlusion comes from the color of the object itself but darker,
the color of the cast shadow come from the color of the background but darker,
the color of the ambient light comes from the color of the nearest object,
the color of the subsurface scattering comes from the object itself but much more vivid
15 notes
·
View notes
Text
(Reformatting the last post...)
Art tutorial for you...
OK SO SUBSURFACE SCATTERING
Real Life Examples:
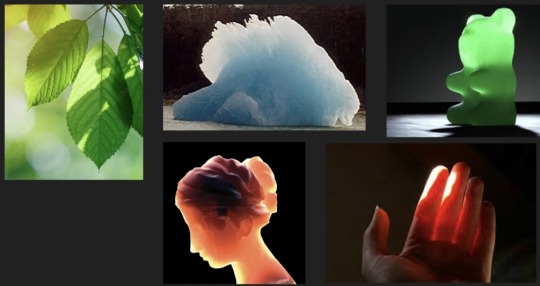
OK BUT WHAT IS IT??!?
- Refers to a phenomenon in which light enters a translucent or semi-transparent material and scatters beneath the surface before being absorbed or exiting the material.
- Causes the soft, glowing effect seen in human skin, wax, marble, etc in harsh lighting
- In the art world, SSS is crucial to creating a realistic and believable rendering of translucent and semi-transparent
Some Science...

So...
And.....

ANYWAYS yeah putting this here to explain part of the last post.
#original art#art ref#art tutorial#art reference#my art#lighting tutorial#light tutorial#subsurface scattering#rendering#rendering tutorial
3 notes
·
View notes
Text
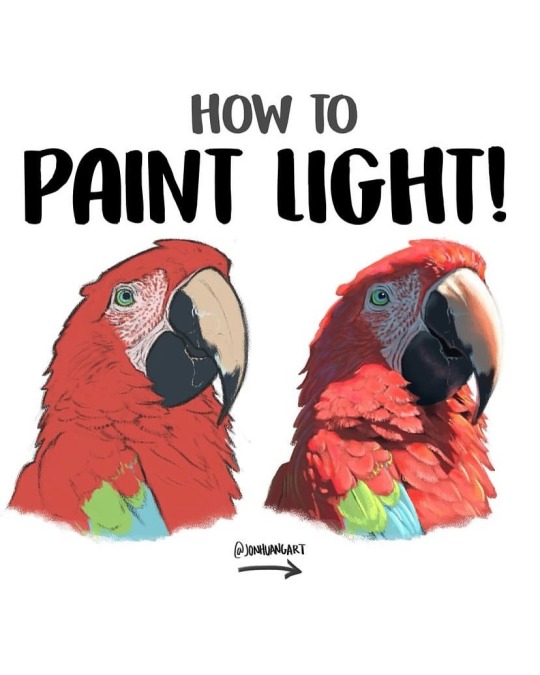

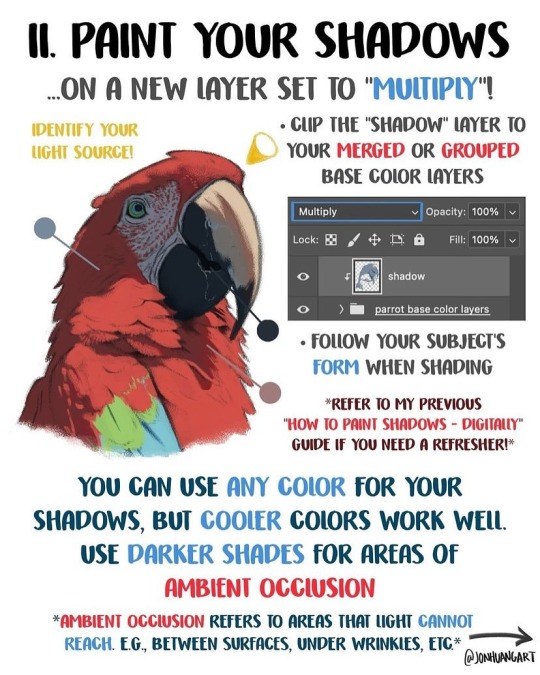
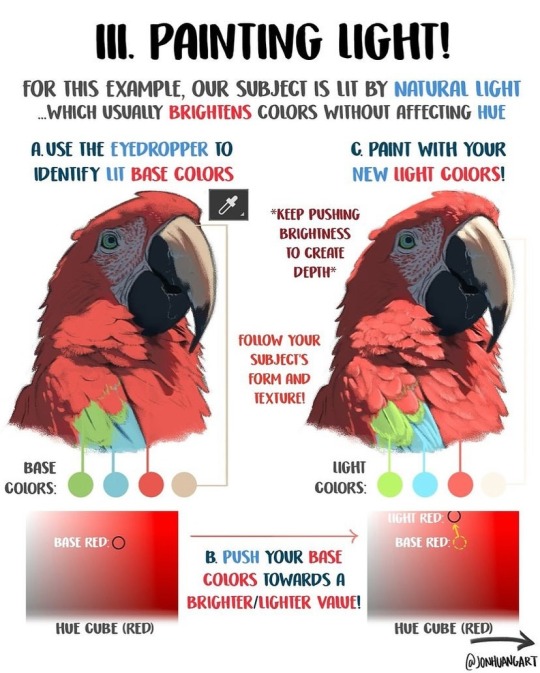
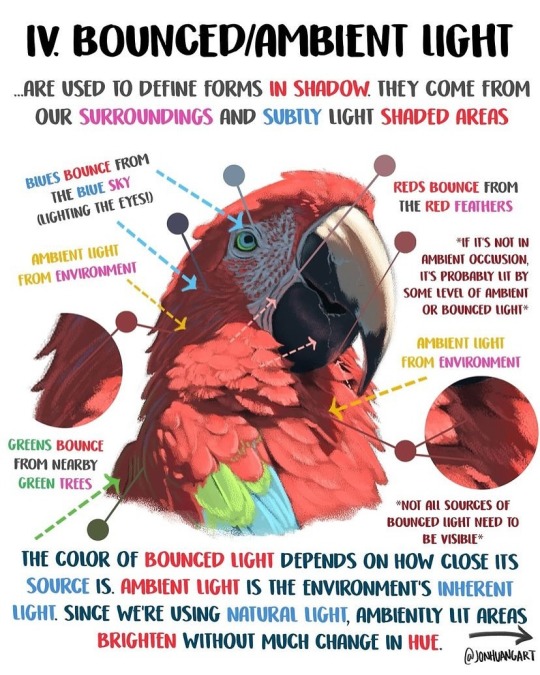
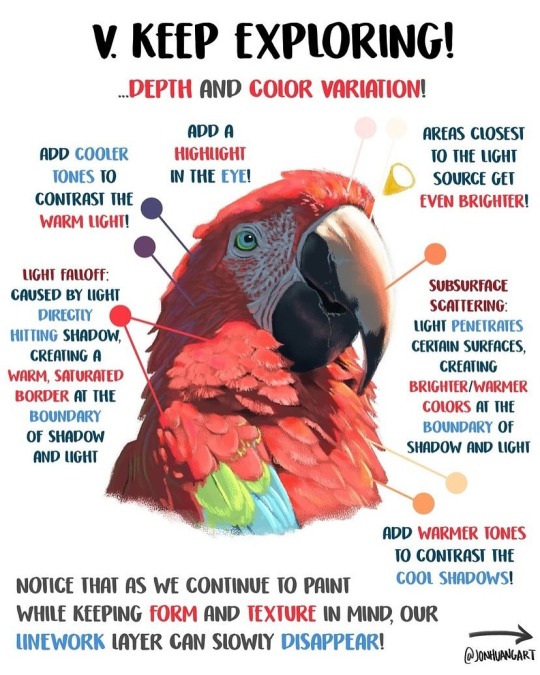
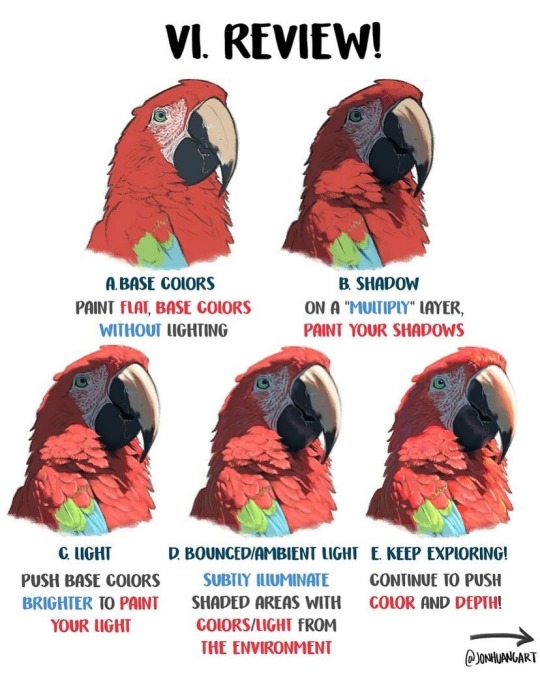
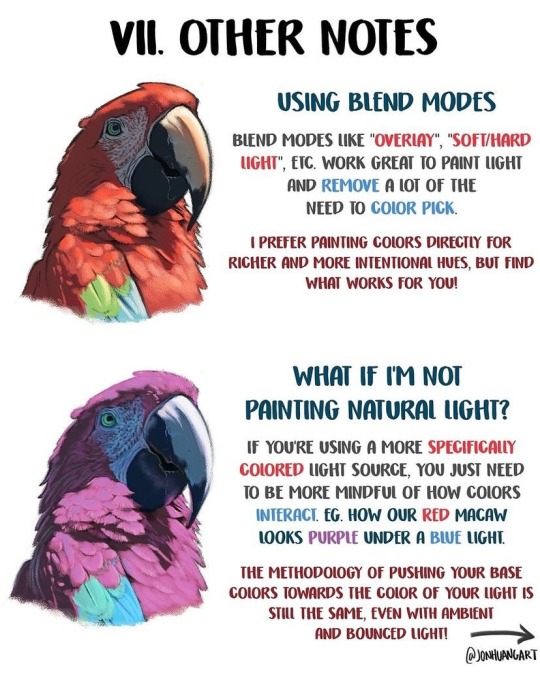

How to Paint Light by jonhuangart
34K notes
·
View notes
Text
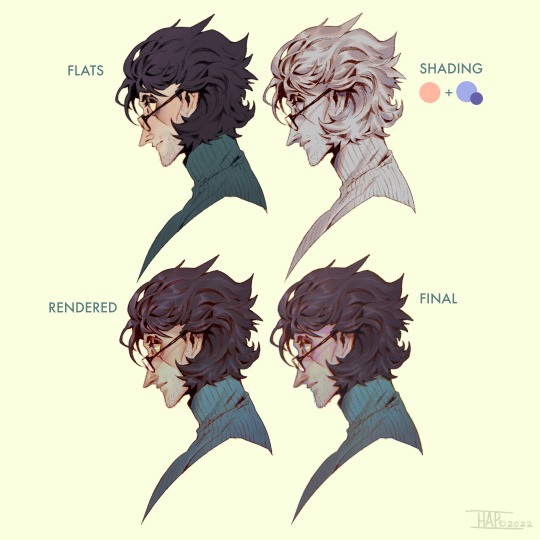
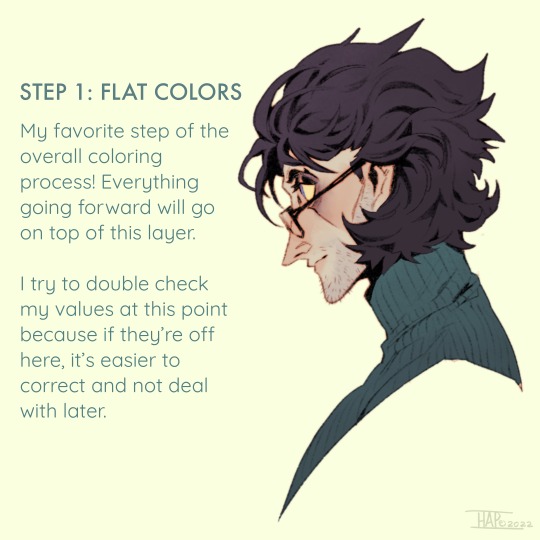
Rendering step-by-step (2022)
#kodasea#own art#2022 art#digital artwork#procreate art#art#artists on tumblr#art tutorial#step by step#shading tutorial#rendering tutorial#drawing tutorial#cold case crew#own character#cold case detective#lawrence#Still follow this basically! Although recently I've been playing with inching back the realism in the light logic/shadows a bit
4K notes
·
View notes
Text
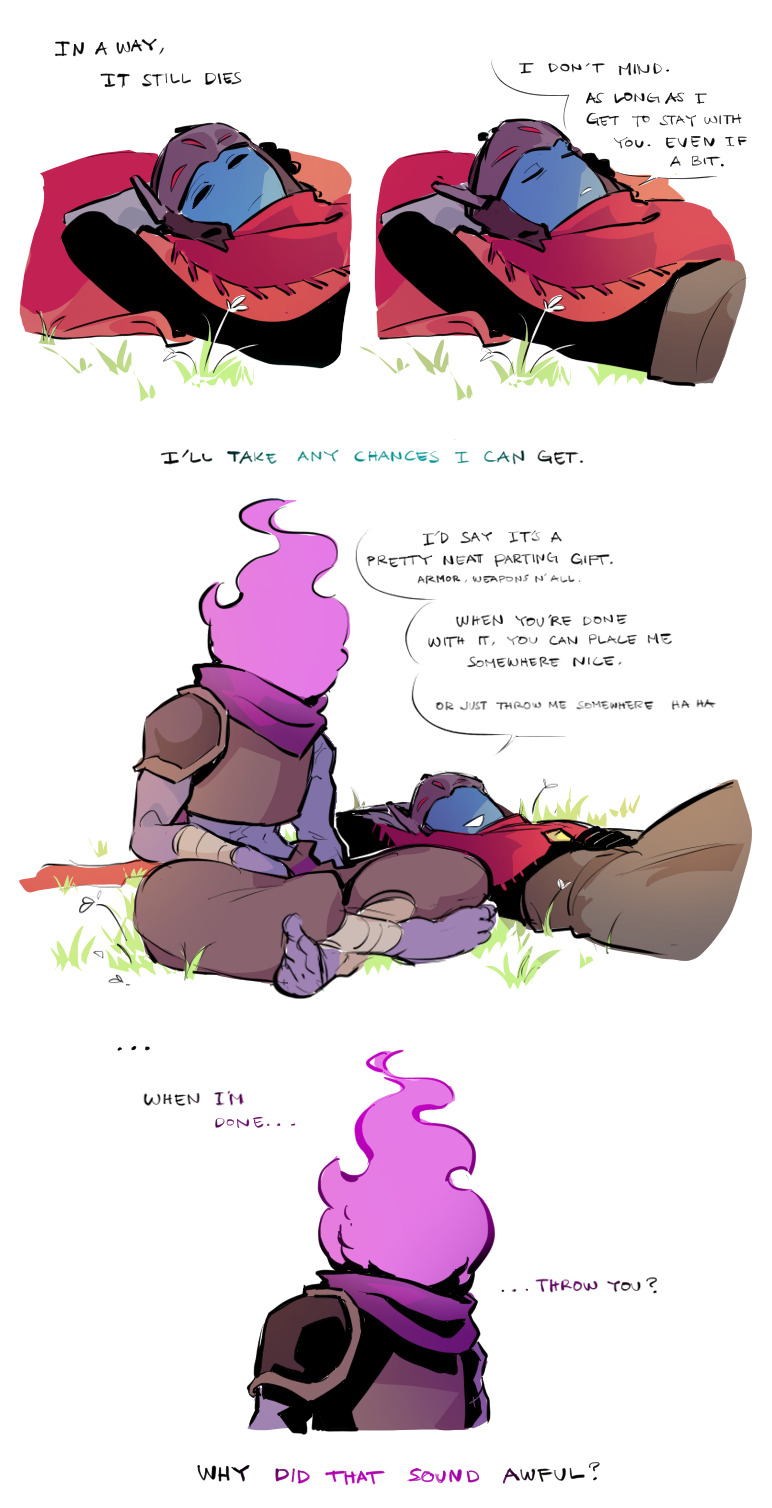
You've done this before...
Countless of times...
Why now?
Bonus :)
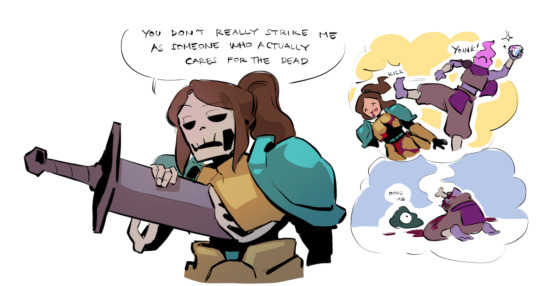
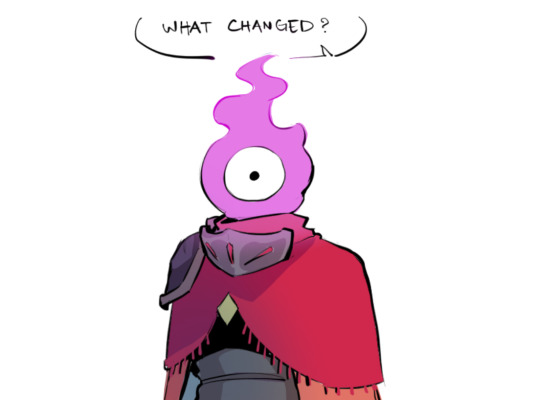
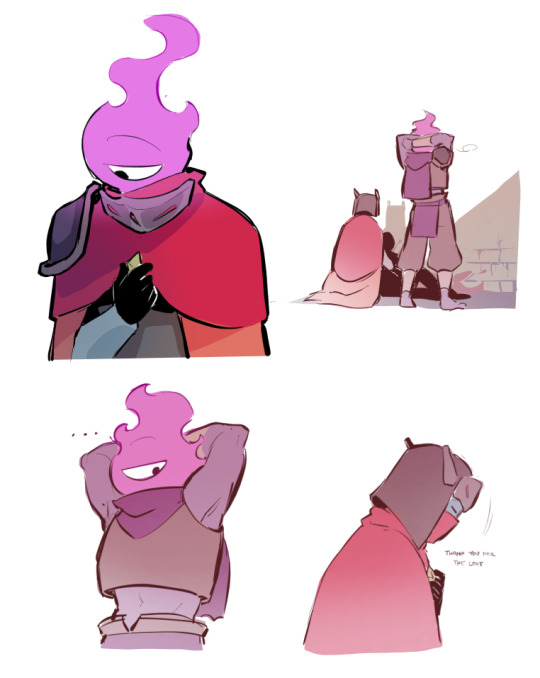
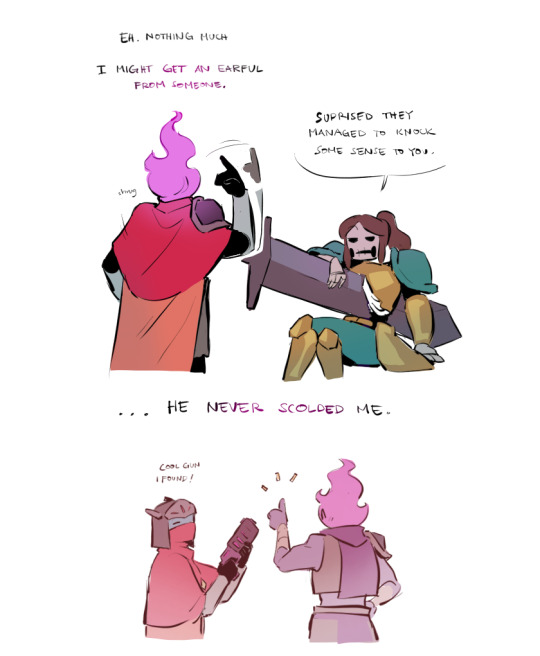
#dead cells#hyper light drifter#driftcells#the beheaded#bobby#tutorial knight#its angst time.. and i angst all over the place..#also sorry if there are mistakes in asl#thinking about drifter being his reason he started caring for both dead and the living...#he knows of his time being so limited. yet as he continue to fell for him...#that dawning fear slowly catches up..knowing that all of their experience will be nothing more than a memory#im ok :)#im not#my art
2K notes
·
View notes
Text


Hi guys, exciting new stuff has been added to my Patreon!
A color and light tutorial (with a speedpaint, art breakdown/analyses, step-by-step tutorials, and more) has been dropped. I've included previews of some of the many assets included in the tutorial. Check it out today!
470 notes
·
View notes
Text


Canon Yotsuba, the creators told me
#bazpangoart#death note#death note fanart#lawlight#light yagami#l lawliet#watched 1/3 of a 'how to render' art tutorial and gave up and did my own thing after getting frustrated#no eyebrows L my beloved you terrifying frog man
730 notes
·
View notes
Text


a short/mini digital painting tutorial by yours truly 🫡
a lot of people really like how i painted kaveh in that short hkvh comic so i thought i'd share a quick painting tutorial! I hope this can be helpful to yall ^_^
#also if you'd like a more in-depth understanding of light & shadow i highly suggest Angel Ganev on youtube#dude explains so well and i like how he respect people's art styles as he improves their art#art tutorial#drawing tutorial#digital painting tutorial#digital art tutorial#artists on tumblr#my art
551 notes
·
View notes
Text
✩ CARRD INSPO by LOVJBINI // © elroseria
like or reblog if you useㅤෆㅤ2024.
✎﹏ please, put “ © elroseria – tutorial by @lovjbini ” in the description if you use our tutorial!
CLICK HERE FOR TUTORIAL
#lovjbini#carrd#carrd.co#carrd co#carrd inspo#carrd tutorial#carrd template#carrd layout#carrd tutorials#carrd templates#carrd layouts#carrd theme#carrd themes#carrd design#carrd designs#carrd stuff#aesthetic#simple#kpop#macbook#pastel colors#pastel aesthetic#kawaii#blue#pastel blue#light blue#facebook
620 notes
·
View notes
Text
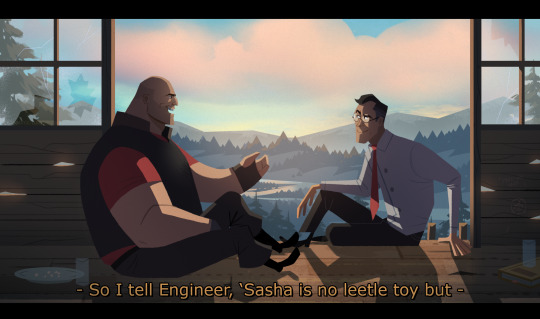
#tf2 heavy#tf2 medic#tf2#tf2 fanart#text is just flavour to make it look more screenshotty idk#there's so much wrong with this image but im moving onto other stuff fkjgjkfds#i'll draw other characters soon i promise#ty for the sweet tags on this!!#i'll do a tutorial at some point as this sort of lighting is NOT complicated at ALL im telling you. it's literally just a multiply layer#and a bloom
4K notes
·
View notes
Text
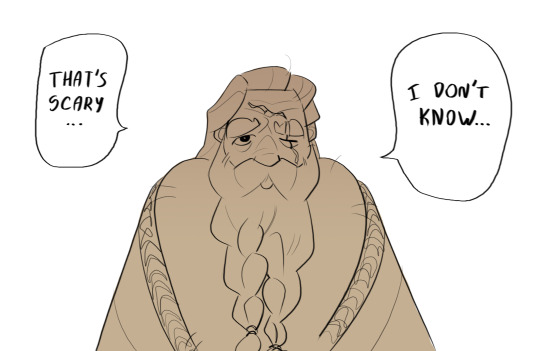
Don't scare the old man
#currently in my shitpost era i have some big ideas that i cant realize rn#gimme some time im watching adobe animate tutorials....#sky children of the light#sky cotl#skyblr#fanart#art#ceasing commodore#meme redraw
311 notes
·
View notes
Note
your shading is AMAZING specially when its conveying organic forms..... do you have any tips for people who dont know wrf going on (with shading)
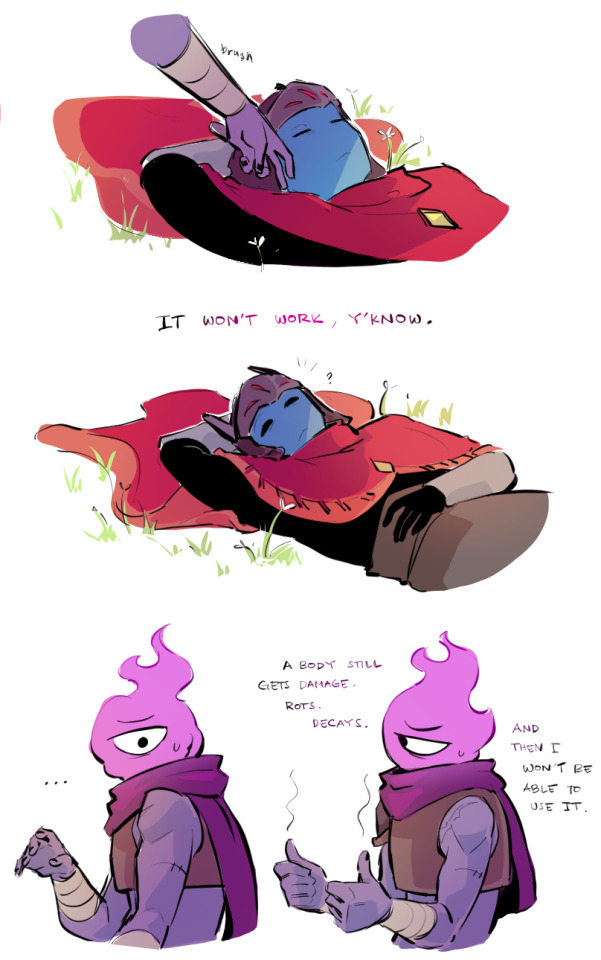
ok so HI. hi. my old tutorial pisses me off so i will make a new one
i made a guy whose sole purpose is to be shaded so dont worry he likes it. and his name. his name will be mr. Boob. mr boob does not have to be blue
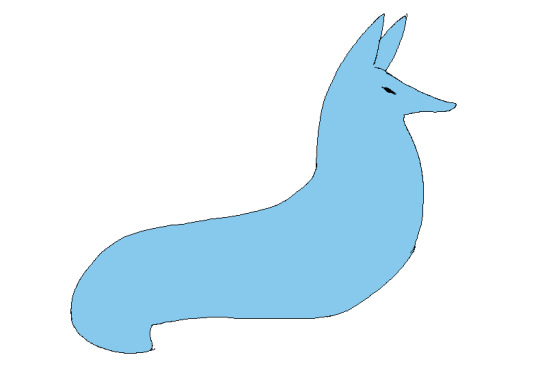
theres probably way better explanations of how to do it but unfortunately trying to "emulate" shading does ask you to somewhat understand ur character in a 3d way. like what would the 2d shape be if you "sliced" it? mr boob is made of so many circles. his tail also does a kind of weird perspective foreshortening thing because its pointing at you. is this being conveyed
you obviuously dont have to draw a horrendous grid on your characters skin to do this . BUT it helps you put down (or at least envision) the lines of the form shading :
dont worry about cast shadows or the shading color because this is FORM SHADOW time only. think about what surfaces of the character are obviously facing away from the light source and put down the "separation line" of the shading based on that. thr most important thing is that youre trying to separate light from dark
im going to pick the first one for cast shadows bc it will be the most obvious to me
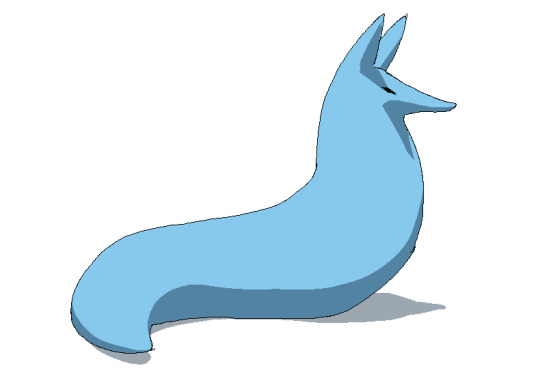
ok so. his ears and snout are blocking other surfaces of his body from the light, which means a shadow is cast!!!! bam. i saw someone describe cast shadows as what the light's pov "can't see." his entire body is putting down a cast shadow on the ground too

im impatient so i blended the form shadows now. its usually the easiest to just NOT blend cast shadows as a way of conveying that they are still cast shadows. but you can still blend them if you want to show "distance" between the obstruction and the surface its blocking. but its just a way of saying form and cast shadows should not be treated the same even if their softness coincides
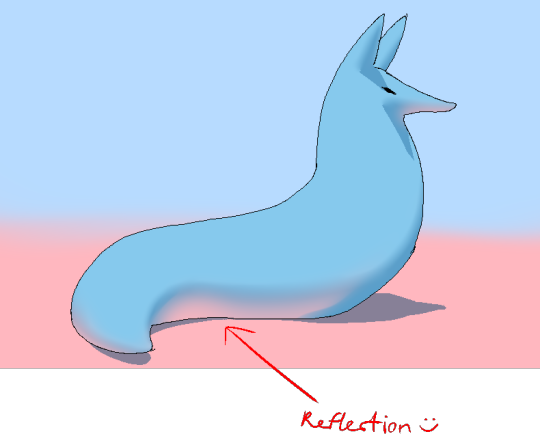
im going to lump reflection and ambient light together because theyre like. similar. reflections dont just happen in mirrors
since the sky is blue, making the ambient lighting, i tinged mr. boobs existing shadow to be a bit blue. (*this is kind of important because it can help you decide a shading color, which should USUALLY be based on the environment) (unless your character is just in the transparent void then it doesnt matter)
since the ground is pink, i made pink light bounce off of him. pointed and labelled. i dont rlly know how to go more in depth than that

contact shadows are literally shadows formed from direct-touching contact. very little light can reach in there, even from how reflections disperse, which means youre free to use the darkest color available (black). in this case mr. boob is making contact with the floor. because he is sitting on the floor.
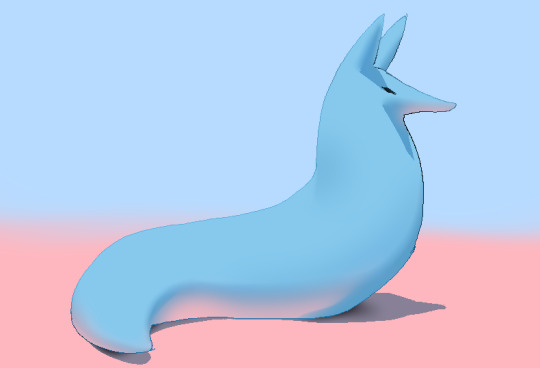
i touched him up a bit and wow!!!!!!!!!! look at mr. boob!!! he is so beautifully sculpted.
and one more thing
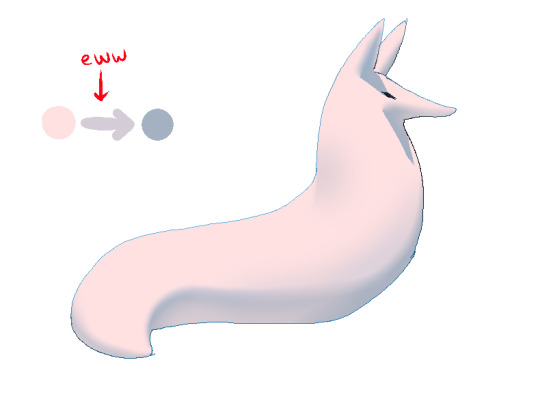
thats right. i made mr boob PINK. hes fucking ruined now. just kidding i would never say that to him
what im trying to convey here (its the easiest with really light colors) is a transitional color. this can also show subsurface scattering depending on how you use it which is fun to look at. the mistake i made on my last tutorial was "Just pick a warm saturated color!" which is really wrong in examples like Blue mr boob. because it would be weird to use a warm color to transition from blue to blue.
if you have a character that isn't bright enough then obviously the shadows wont be as visible. its BEST to bring more attention to highlights and reflections to reveal the form a bit. they play the biggest role with darker colors
thats all i can think of. fun things to look up:
structuralization + contour lines + foreshortening etc. 3d lingo
form shadows
cast shadows
ambient light
contact shadows
subsurface scattering
im also just speaking out of my ass otherwise. i didnt look up any of these terms until the end now im inferring and hoping i got them right
and remember every time you shade mr boob will be rooting for you
2K notes
·
View notes
Text
"One often meets his destiny on the road he takes to avoid it."

I finally charged my tablet and now im unstoppable. So have a little off screen scene from chapter 1 of TDSB
#tim drake#batfam fanart#the drakes spoiled brat#sunny art#trash tim au#tim drake fanart#a little treat#a few crackers waiting on the pot#experiementing with some lighting shit#aka I watched a render tutorial#gave up#found new funky shit#also yes I did NOT draw those hands#thank god for pinterest photos#batman#dc#batman dc#batfam#batfamily
163 notes
·
View notes
Text
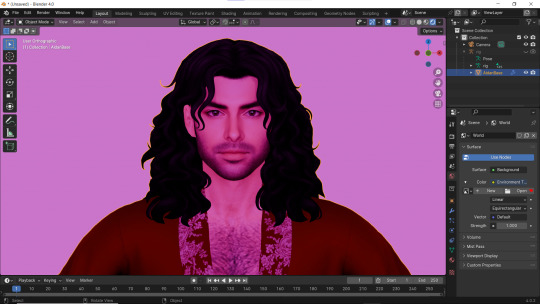
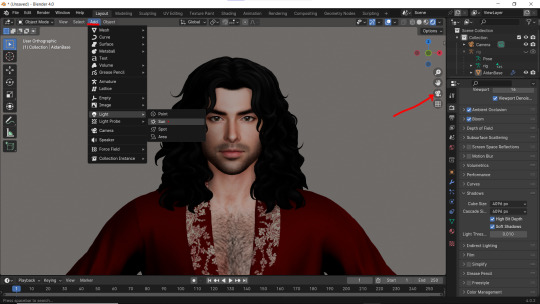
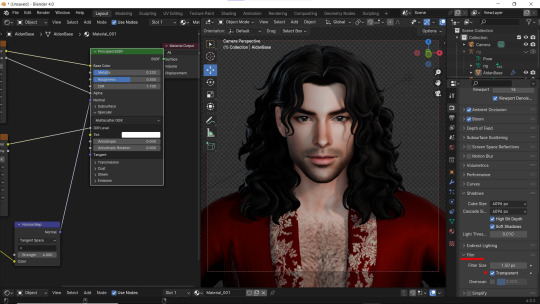
How I do my lighting in EEVEE for Blender 4.0 (´。• ᵕ •。) ♡
Are you running your Blender on a toaster? Don't wanna spend much time on rendering in Cycles? Here's some EEVEE tips for you!
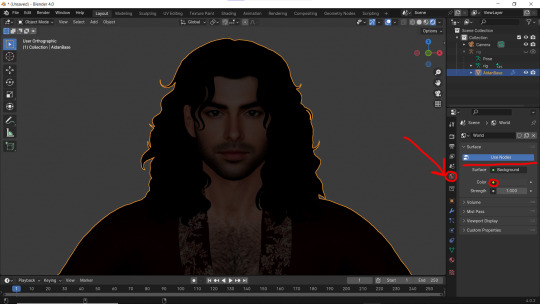
1 - Let's put some HDR lighting on! Go to the Worlds, choose Use Notes and hit that little yellow dot next to the Color.
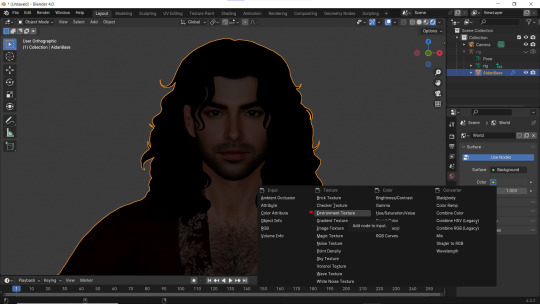
2 - Pick 'Environment Textures'
3 - You'll see everything in purple. But worry not! It's just bc you haven't applied any textures yet! Just go on and hit Open.
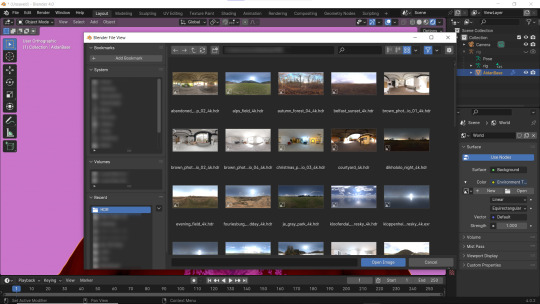
4 - You can find plenty of free, high resolution HDRI textures on Poly Haven. I have almost all of them! Go get some for yourself too and navigate to their location. Pick any you like!
Well... It doesn't look good yet :D
5 - Lower the Strength of the light.

6 - Now. Let's go to the Render Properties and check Ambient Occlusion and Bloom (you can play with it's parameters and see which fits you better). THEN... Go to Shadows and increase the resolution to the max. High Bit Depth and Soft Shadows must be checked too!
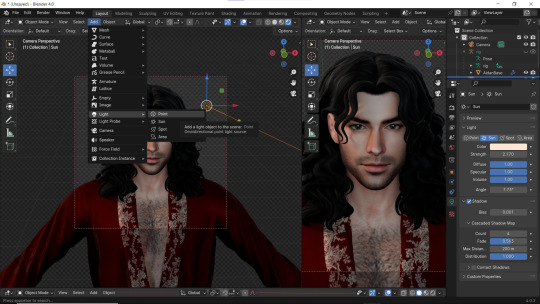
7 - Let's Add our very first light (The Sun)! And go to the Camera Mode.

8 - In the Sun Shadow settings: Soften the light by increasing the Angle; Lower Bias to the max.
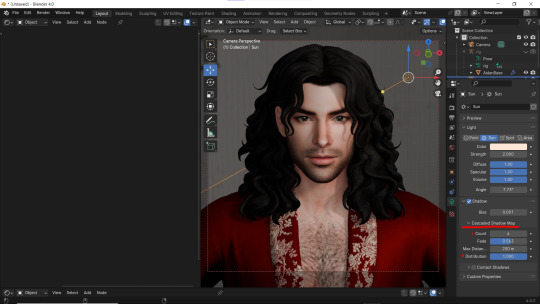
9 - Change the parameters of Cascade Shadow Map the way it looks better for you.
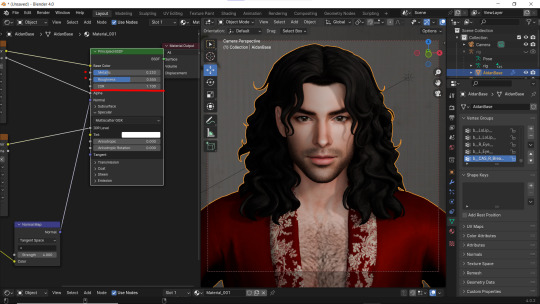
10 - Also don't forget to fix the specular appearance of your model ;3
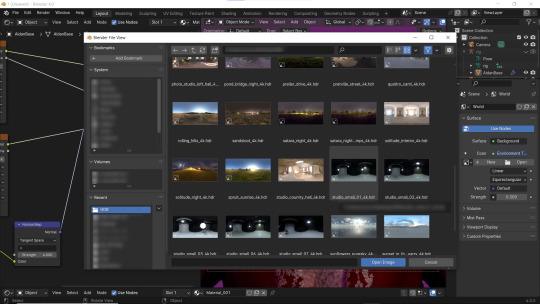
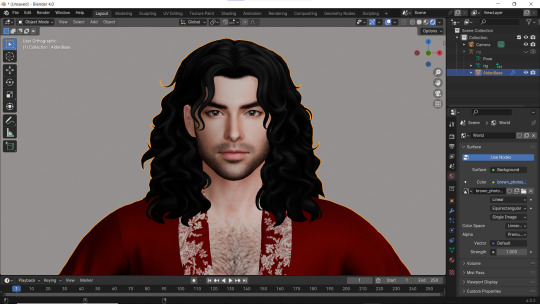
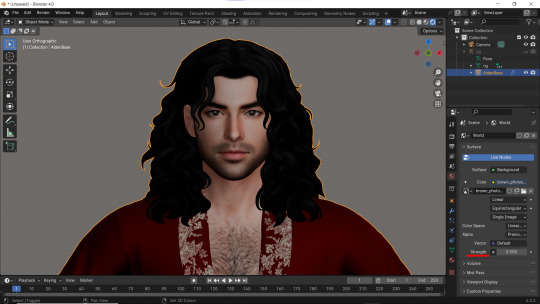
Now. I don't hate it. But I don't like it much either... So I played and tried several Environment textures for better result.
11 - Looks way better! Now let's go to the Render Properties once again and remove the background in the Film category (in case you don't want one)
12 - It's time to add another light source!
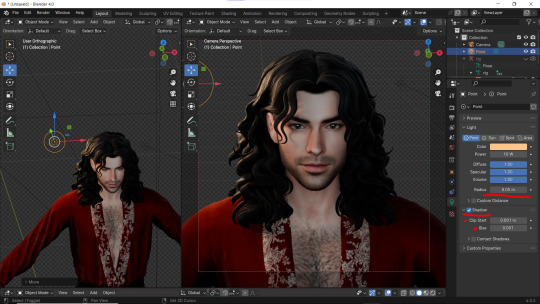
13 - Settings for the new light are quite similar. I made them softer, lowered Bias, changed color, etc.
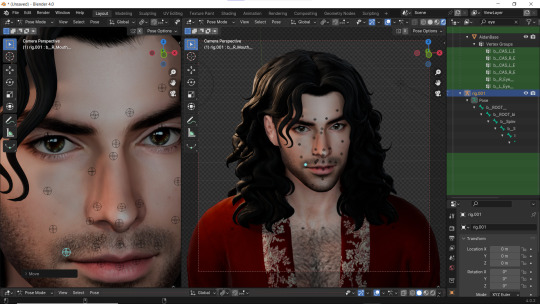
14 - Preparing for the shoot. ▓▒░(°◡°)░▒▓
15 - You did it! (ノ◕ヮ◕)ノ:・゚✧
#WistfulTutorialSims4#the sims 4 blender#sims 4 blender render#blender 4.0#blender eevee#sims 4 tutorials#blender tutorial#sims 4 blender render tutorial#blender render#blender eevee lighting#blender environment textures#sims 4 blender#blender render eevee#blender light#blender light eevee#eevee#blender#simblr#the sims 4#my sims
156 notes
·
View notes